Is it possible to measure a room precisely using a smartphone? In the past, accurate interior surveys required a tape measure, a laser distance meter, and plenty of time. Today, a modern phone equipped with a LiDAR scanner is enough to scan rooms and create their 3D digital models and 2D plans. LiDAR (Light Detection and Ranging) uses laser light to measure distance, recording the return time of the beam and using it to build a precise, three-dimensional map of the surroundings. Although LiDAR was initially used in professional surveying and remote sensing (e.g., terrain mapping, seabed mapping, or traffic analysis), this advanced measurement technology has now reached everyday users—newer iPhone Pro models are equipped with the sensor, turning them into handy laser scanners. As a result, AR (augmented reality) apps like AdPlan can deliver an accurate floor plan of a room in seconds, saving time and reducing the risk of errors compared to traditional methods. Below is a practical guide on how to measure a room with your phone using AdPlan—step by step, from preparation, through scanning perimeters and details, to exporting the finished plan.
Preparing to Measure Floor Area with a Phone
Before you begin scanning, make sure the basic technical requirements are met and that room conditions are suitable. Key preparation steps:
- Suitable hardware: You need an iPhone with LiDAR—e.g., Pro models starting with iPhone 12 Pro and newer. Only devices with a built-in LiDAR sensor support automatic space scanning—other phones are limited to a less accurate AR mode. Also ensure your battery is charged; 3D scanning uses the camera and sensor intensively, so longer sessions can consume significant power.
- Stable grip: Treat the phone like a measuring instrument—hold it with both hands and move smoothly, avoiding jerky motions. Device stability directly affects measurement accuracy; movements that are too fast or chaotic can reduce precision or cause parts of the room to be missed. If needed, consider a small tripod or handle, though a steady grip is usually enough.
- Lighting conditions: Ensure good interior lighting. LiDAR works even in the dark by emitting its own infrared light, but the phone’s camera, which supports AR, tracks the environment better with adequate light. Turn on the room lights or wait for daylight—this helps capture all details and textures and lets the camera focus more quickly. Avoid complete darkness; while LiDAR measures distance regardless of light, some AR elements (e.g., overlays) may require minimal illumination.
- Room preparation: Where possible, clear corners and walls you plan to measure. Temporarily remove large obstacles near walls—tall plants, boxes, curtains—especially in room corners. While the scanner can detect walls even in cluttered interiors (furniture and fittings typically don’t hinder distance measurement to walls), for full accuracy it’s best to have a direct “line of sight” to every floor and ceiling corner. Mirrors or glass surfaces can disrupt readings (the laser can pass through glass or reflect incorrectly)—if possible, open mirrored closet doors or mark these spots manually during editing.
- Quick preliminary walk-through: Before the main scan, do a short “walk-around” with your phone to get a feel for the layout. Launch AdPlan in AR mode and walk along the room’s perimeter, pointing the camera at key points: corners, wall edges, ceiling. This lets the app pre-map the environment—the phone builds a spatial model in real time as you move. Such reconnaissance reveals tricky spots (e.g., recesses, steps) that will need special attention. In addition, ARKit (Apple’s AR framework) anchors better in space after a few movements around—improving the stability of later measurements. If you’re measuring multiple rooms or floors, plan the order—map out a scanning path to cover the whole area without missing nooks and crannies.
After this prep, you’re ready for the actual room measurement. Remember: a calm, systematic approach is key—the modern tech will do the rest, converting laser and camera data on the fly into a digital plan of your interior.
Step-by-Step Measurement—from Perimeter to Details
With the phone and room ready, start scanning. Below is the process step by step—from outlining the room shape, through dimension checks, to capturing irregular forms and details. AdPlan guides you with on-screen prompts, and many tasks are automated via AI and sensors. Still, understanding each stage helps you get the most from the tool and achieve the best precision.
Marking Corner Points and Edges (Automatic Wall Detection)
The first task is to capture the room’s basic shape by delineating the wall perimeter. Traditionally, this meant measuring segments with a tape from corner to corner—here, the scanner and plane-detection algorithms do it for you. After launching AdPlan, choose Auto-scan (LiDAR) and aim the camera at the walls: the app automatically recognizes wall surfaces and corners—you’ll see room edges highlighted as a virtual grid or lines. Your job is to walk around the entire room: move slowly along the walls, keeping the phone steady so each perimeter section is detected and recorded. Starting from a corner, move along a wall—when you approach the corner, the app will mark it (you can also tap to select it manually if the system misses it). Then continue along the next wall. Proceed until you return to your starting point, closing the loop.
During the perimeter scan, a white line or grid indicates detected edges, and corners may be marked with virtual posts or pins. If a corner is hard to reach, get closer and aim the camera at it from different angles. AdPlan uses LiDAR data to determine the intersection of walls even if partially obstructed—automatic corner detection speeds up work and ensures drawing consistency. In automatic mode, the app creates a closed polygon representing the room outline. A live 2D plan preview of the current room appears on screen.
Importantly, AdPlan records not just walls but also openings and other room elements. Doors, windows, and larger fixed objects (e.g., columns) are recognized and added automatically during scanning. Just point the phone at the element as you walk—e.g., sweep the camera along a door or window frame. The app records their location and dimensions. The final plan will show doors and windows in the right places, with no need to measure their height or width manually. That’s a major advantage of modern AR—architectural details are captured automatically, producing a rich, detailed plan. If a window isn’t detected (which can happen with very atypical shapes), don’t worry—you can add or adjust it later in editing.
Recap: walk the whole interior, letting the app mark edges and corners of all walls. Check the 2D preview to ensure lines form a closed shape matching the room. If you see a gap (e.g., the app didn’t “close” the loop or missed a segment), stop and aim at the missing stretch—the system will try to fill it in (undetected sections may be shown in orange—indicating you should rescan them). Once the perimeter is complete, you have a solid base for further measurements.
Height, Length, Width—Reading Dimensions and Retakes
After scanning the outline, verify key dimensions: room height, wall lengths and widths, and other important distances. AdPlan (and similar apps) typically computes wall lengths and floor area automatically from the model. In practice, once the loop is closed, you can read dimensions—figures usually display next to segments in the 2D plan, or you can tap a wall to see its length. Don’t stop at automated readings, though. Now is the time to measure height and verify other distances—so you’re confident the model reflects reality accurately.
- Height measurement: With a LiDAR-equipped iPhone, this is easy—AdPlan can measure room height with a single tap. After the perimeter scan, the app may ask for LiDAR height or read it automatically if it captured floor-to-ceiling data. Ensure the phone “sees” both floor and ceiling (point the camera straight up and down). Then trigger the height measurement—e.g., aim the marker at the ceiling and tap to measure. LiDAR returns floor-to-ceiling distance with centimeter-level accuracy (Apple indicates ~1 cm precision for distance with this sensor). If the result looks suspicious (e.g., 2.80 m instead of ~2.50 m), repeat: check the phone isn’t tilted. Ideally, stand near the center, hold the camera level, then raise it toward the ceiling so the laser hits it perpendicularly. A repeat should stabilize the value. If needed, use a classic laser tape as a reference (measure manually and check whether the difference is only a few cm—see calibration in Quality Control).
- Verifying wall lengths: Even if the app lists wall lengths, it’s worth re-walking along them with the phone. Use the in-app AR “ruler”: most measurement apps let you set a start and end point to measure between them. Manually check one or two walls, especially the longest. This confirms the auto scan didn’t skew scale. Remember, manual AR measurement still uses LiDAR, improving accuracy over camera-only methods. If a value differs by more than ~2–3%, adjust corner points (nudge a corner a few cm) or rescan that segment. Retakes at this stage are normal—even pro laser meters sometimes need a second try. The advantage of digital: you instantly see plan updates after a fix.
- Additional dimensions and objects: Watch for irregularities worth measuring separately—e.g., a niche (closet recess). Ensure the app captured its depth and width correctly. LiDAR usually detects such recesses automatically (as an additional interior wall fragment), but it’s good to check to keep the 2D plan precise. Likewise, if there’s a step or level change in the floor or a dropped ceiling—LiDAR should detect these (via different point heights), but if the app lets you add a note or local height, use it. For example, measure the window reveal depth, sill height, or roof slope height (in an attic)—these might not populate automatically but can be important.
Bottom line: collect the full set of key dimensions. The app did most of the work automatically, but your checks and tweaks ensure no dimension meaningfully deviates from reality. If necessary, don’t hesitate to rescan—better to spend an extra minute now than discover a documentation error later.
Irregular Shapes—Zoning and Merging Results
Many homes have rooms with non-standard footprints: L-shapes, curves, bay windows, or protruding columns. Irregular shapes can be challenging, but modern apps handle them well. The key is to scan strategically, dividing the space into smaller zones and ensuring full coverage.
If the room layout is complex, split scanning into segments. For an L-shaped room, treat each “leg” separately: scan the main rectangle first, stop and save, then scan the smaller annex as another “room.” In AdPlan, you can create one project with multiple rooms—even if it’s a continuous space, scanning in two parts is easier, and you can merge them later. The app supports multi-room projects, letting you scan entire apartments in one session. It will often recognize boundaries (e.g., door frames) and break the plan into rooms. In open-plan spaces without clear boundaries, you decide the zones for easier measurement.
When scanning in parts, ensure overlap between zones—start the next scan including 1–2 meters of the already scanned area. This makes alignment easier later. In AdPlan, after scanning multiple rooms, you’ll see them in a shared plan and can adjust relative positions (rotate/slide) if the app doesn’t auto-align perfectly. Use editing to connect rooms—e.g., delete a temporary wall between L-segments to form a single complex room.
For irregular shapes, capture every inflection and direction change. Don’t assume “it probably got it”—watch the 2D/3D visualization while scanning. If a curved wall is simplified to a straight line, scan it in shorter sections (from multiple angles) or add more points along the curve. For columns, walk around them up close—LiDAR will register a separate 3D object (a rectangle in 2D; a solid in 3D).
In short: scan complex spaces piece by piece, ensuring nothing is missed. AdPlan is built for this—measuring walls, floors, and ceilings of irregular shapes. After scanning zones, refine the model in editing (align fragments, close angles). The result: a complete plan of even very atypical rooms, without missing critical details.
Quality Control and Corrections for Usable Floor Area
Once the measurement is complete and you have a generated plan, don’t stop yet. Professionals always verify collected data—you should, too. That way, you can rely on your digital plan for design, estimating, and beyond. Key quality-control steps:
- Review the 2D floor plan: Open the plan and examine it critically. Check every listed linear dimension—wall lengths, distances between windows, niche widths, etc. Does it match reality? If you recall a rough length (~4 m) but the plan shows 4.50 m, investigate. A corner may have been mis-snapped, “stretching” the model. The app lets you correct this—select the corner and nudge it, watching the dimension update until it matches reality.
- Compare with a reference measurement: One of the best checks is to compare the model data with at least one traditional measurement. Make it a rule: measure at least one accessible dimension (e.g., the longest wall, a window width, a door width) with a tape/laser and compare to AdPlan. If the difference is minimal (1–2 cm over several meters), you’re good—LiDAR indeed offers centimeter-level precision. If the difference is larger, calibrate. Some apps allow scale correction by entering a known dimension. If AdPlan doesn’t do this directly, you can manually stretch/contract the distance between points in the editor. iPhone scanners are very accurate, but they’re handheld—small shakes or tracking errors can introduce a few percent deviation. Golden rule: trust, but verify—one control measurement protects you from basing work on a wrong number.
- Verify detected elements: Check doors and windows in 2D elevations (if available) or in 3D. Ensure counts, orientation, and approximate positions are right. If a window is missing—perhaps hidden by a curtain—add it manually and assign known dimensions from a manual measurement. Similarly, if doors are duplicated (can happen when scanning both sides of a wall), remove the extra.
- Geometry corrections: AdPlan offers corner editing with auto angle snapping, making it easy to correct geometry. If walls that are truly perpendicular appear slightly skewed, select the corner and snap to 90°. Ensure the outline is closed—no gaps or overlaps at wall joins.
- Analyze area and perimeter: Check automatic values—floor area (m²) and perimeter (m). Do they make sense? (~4×5 m ≈ 20 m²; if you see 30 m², something’s off). Automatic perimeter, floor area, and wall area are very helpful—as long as the model is correct. A quick sanity check can reveal issues (e.g., an inflated perimeter may mean a wall got counted twice).
These checks take minutes and give you confidence in a detailed, precise digital model. You can then use it for layout design, material estimation, or contractor documentation. As pros say: “measure twice, cut once”—here, scan well once, and your digital record lets you “re-measure” anything from your desk.
From Measurement to Plan—2D and 3D
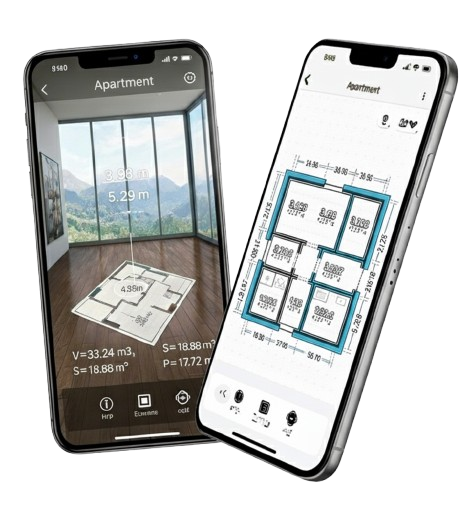
After a successful scan and fixes, the most satisfying part: seeing results. Instead of a paper sketch, you get a complete digital plan in multiple forms. AdPlan automatically generates both a classic 2D top-down plan and a 3D model. You can also view interior wall elevations, showing window and door placement on each wall. This multi-view output makes planning and visualization easier.
Recommended steps now:
- Name the room and assign a floor: Label what you measured—e.g., “Living Room—Ground Floor.” In multi-room projects, AdPlan separates scans into rooms; give clear names (Kitchen, Bedroom) and ensure they’re assigned to the correct levels. This keeps exported files clearly labeled (e.g., “Attic_Plan.pdf”).
- Review the 2D plan: This is your fundamental deliverable. Confirm standard symbols are present: doors (wall break with swing arc), windows (breaks with thin lines), etc. Ensure dimensions are visible—apps usually draw dimension strings automatically. You can annotate the plan (e.g., “French window 240×200 cm,” “Radiator here”). AdPlan supports traditional flat layouts and side wall views for complete technical documentation.
- Inspect the 3D model: Switch to 3D (dollhouse or free 3D view). The model shows wall heights, openings, and sometimes basic objects. It’s not just flashy—interactive 3D helps check clashes and visualize arrangements. AdPlan includes a 3D planner to virtually furnish the room; even a bare model is very useful.
- Use automatic calculations: With the plan ready, use smart calculations. AdPlan provides not only area and perimeter but also wall surface area—handy for paint or wallpaper estimates. Options often include floor layers; for volume, multiply area by height. Use these data for materials planning (e.g., 50 m² wall area ≈ liters of paint). AdPlan can also support rough cost estimation from the plan.
- Editing and extra modeling: If needed, model additional items—planned partition walls, door swing directions, etc. AdPlan allows editing after the scan, turning it into a planning tool as well as a measurement tool.
The outcome is a fully digital, detailed, precise room model. You get a 2D plan akin to AutoCAD and a 3D model like in pro design software—produced in minutes with your phone. Next: share or integrate the data with other tools.
Export and Collaboration
One of the biggest benefits of digital interior surveys is how easy it is to share and reuse results. AdPlan can export plans and models to popular formats, simplifying integration with other software. With a finished plan, you can export with a tap to PDF or DXF, and more. How to make the most of export and collaboration:
- Export to PDF: Ideal for clients or contractors. AdPlan generates a clear document with the 2D plan and dimensions (and optional views). Email, add to project docs, or print at any scale. PDFs can include area and perimeter summaries—useful in proposals.
- Export to DXF: The CAD interchange standard (e.g., AutoCAD). AdPlan’s DXF contains a vector drawing of your room. Architects/engineers can import it directly into technical projects, skipping manual drafting. Ensure scale is correct (verified in QC), then add layers (services, furniture, etc.) on top.
- Export 3D model (OBJ, DAE): To move 3D models into other apps. OBJ is broadly supported (Blender, 3ds Max, SketchUp), DAE (Collada) also works widely. Import the scanned room into 3D environments for visualization, furnishing, lighting, rendering, or analysis. AdPlan preserves scale and proportions—no extra setup needed.
- Collaboration and sharing: Share floor plans via email, messaging, or cloud directly from the app. You can send a project from site so the office has it before you arrive. For clients, share a 3D view or 2D PDF for approval—reducing misunderstandings.
- Storage and archiving: Keep scanned projects organized in AdPlan’s archive and store exported files in the cloud (Dropbox, iCloud). Standard formats (PDF/DXF/OBJ/DAE) remain useful for years.
In short, AdPlan streamlines the entire workflow—from field measurement, through analysis and concept work, to handing off documentation. Integration with AutoCAD, SketchUp, Blender, and others unlocks endless possibilities.
Common Mistakes and How to Avoid Them
Measuring rooms with a phone is straightforward, but beginners may make some typical mistakes. Fortunately, they’re easy to avoid:
- Moving too fast: Rushing can cause missed areas or tracking loss, distorting the model. Fix: scan methodically and smoothly; heed on-screen coaching; pause briefly at corners.
- Skipping corners and nooks: Focusing only on main walls misses corners or recesses. Fix: bring the sensor into every corner; monitor the live model; rescan orange/undetected sections.
- No verification with a tape: Blind trust in tech can backfire on critical dimensions. Fix: always check at least one dimension manually and calibrate if needed.
- Poor environment conditions: Darkness, mirrors, moving people hinder scanning. Fix: turn on lights; limit movement; clear access to walls where possible.
- No backup of results: Relying only on the phone risks data loss. Fix: export immediately and archive in the cloud.
Follow these tips and phone-based measurement will be quick, smooth, and accurate. LiDAR plus mature software (like AdPlan) is powerful, but a bit of best practice unlocks its full potential.
Summary
Measuring rooms with a LiDAR-equipped phone is a game-changer for anyone who needs a quick, precise interior plan. With AdPlan, your smartphone becomes a powerful measuring tool—combining laser tech and AR to automatically generate accurate 2D plans and 3D models. This guide showed you how to prepare your phone and space, scan step by step (perimeter, height, details), control quality, and export results for further use. Ready to try it? Pick up your iPhone and go!
➡ Try AdPlan today—download it from the App Store and see how easy and accurate interior surveys can be. Turn your phone into a 3D scanner and join satisfied users who’ve saved time and stress with modern measurement technology. Download here: AdPlan – 3D Scanner for Building Measurement, and start planning your spaces precisely and conveniently!